Hello friends, today we will learn how we can create a Simple Calculator Program in Java Using Swing with Source Code. This is going to be our first application using swing programming, where we will develop a simple calculator using Swing. This is going to be a simple Java GUI calculator project which will perform basic arithmetic operations like addition, subtraction, multiplication, division, etc. It can also be used for finding the square, square root, and reciprocal of any number.
Before starting this tutorial, I assume that you have the basic concept of swing components, and also you should have the idea of JButton Click Event, which means the response of a button when we click on it. If you already know about the Basics, then we can move ahead to create a calculator using swing components in Java.
I will use NetBeans IDE(integrated development environment) for the coding part of my calculator program. You can use any IDE like IntelliJ IDEA, Eclipse or you can just use notepad++ to code your program. It doesn’t matter whatever IDE or editor you will use the programming logic will be the same.
So friends, lets get started with our tutorial Simple Calculator Program in Java Using Swing or can say simple calculator program in Java using JFrame/frame step by step. You can also download the Java Calculator Source Code at the end of this tutorial.
Related Articles
Simple Calculator Program in Java Using AWT
Login Form in Java Swing
Simple Calculator Program in Java Using Swing
Creating a New Calculator Project in NetBeans
Step 1
First of all, we need to create a new project in Netbeans. For this, follow these steps.
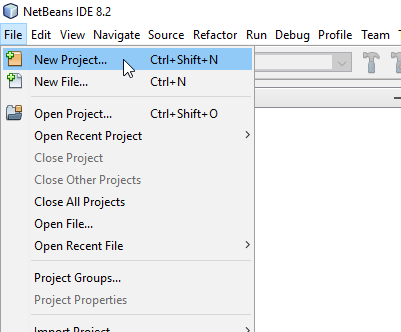
- Open the NetBeans IDE and then click on the File menu and then select New Project.

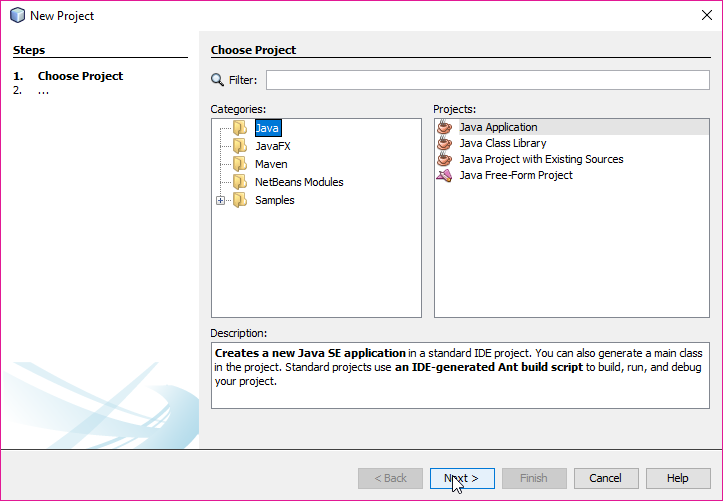
- After that, a window will be opened. From there, select Java in categories and Java Application in projects and then click on the Next Button.

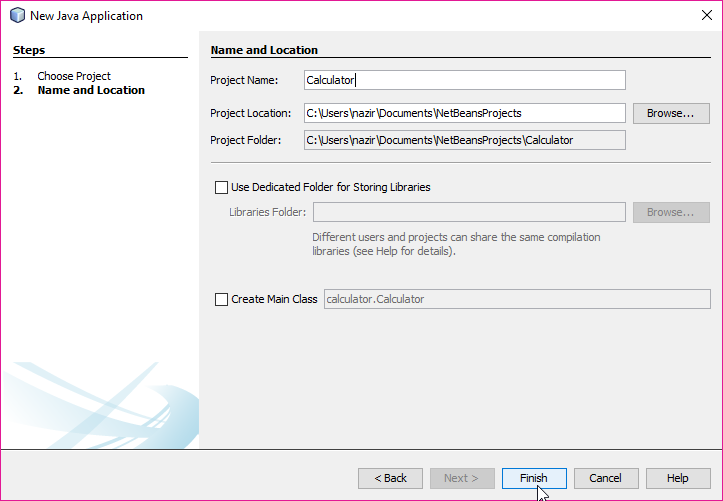
- After you click on the Next button again a new window will be opened and there you have to give the name of the Project (Calculator in this Example) and also uncheck the create Main class option.
- Then click on the Finish Button.

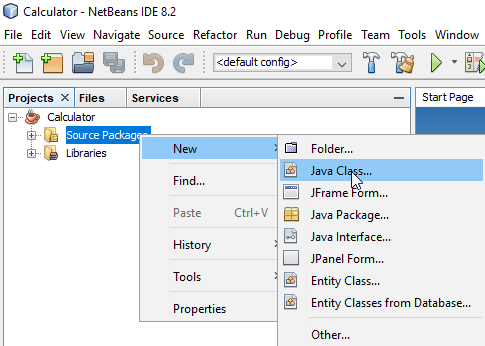
- Now expand your project using the + icon and right-click on the source packages.
- Then select new>>Java class.

- A new window will be opened where you have to give the name of your Java class (Calculator in this Example).
- Then click on the Finish button.

Creating Display Window for Calculator
Step 2
Now we will create a display window or frame for our calculator.
- Create an object of the JFrame class and set some of its properties like its title, visibility, background color, layout property etc. using the method of the JFrame class.
|
1 2 3 4 5 6 7 8 9 10 11 12 13 14 15 16 17 18 19 20 21 22 |
import javax.swing.*; import java.awt.*; public class Calculator { JFrame frame;//Creating object of JFrame class Calculator()//Creating constructor of the class { prepareGUI(); } public void prepareGUI() { frame=new JFrame(); frame.setTitle("Calculator");//Setting title of the JFrame frame.setSize(300,490);//Setting size frame.getContentPane().setLayout(null);//Setting Layout frame.getContentPane().setBackground(Color.black);//Setting Background Color frame.setResizable(false);//Preventing window from resizing frame.setLocationRelativeTo(null);//Setting location to the center of the screen frame.setVisible(true);//Setting window's visibility frame.setDefaultCloseOperation(JFrame.EXIT_ON_CLOSE);//Setting default close operation } } |
- Now create another Java class(MainClass in this example) and inside the main method just create an object of our Calculator class.
- To create New Java class, right-click on the source packages and then select New >> Java Class.

- A new window will be opened where you have to give the name of your Java class (MainClass in this Example).
- Then click on the Finish button.

- After that, create the main method and create an object of the Calculator class inside the main method.
|
1 2 3 4 5 6 7 8 |
import javax.swing.*; public class MainClass { public static void main(String[] args) { new Calculator(); } } |
- After that, we need to run or program. To run our program right click on the file MainClass.java and then select Run file.

After Running the Program, you will see the output below.

- Now as you can see that we have successfully created our display.
- Now the next thing we have to do is to add components to it.
Adding Components to Our Display Window/Designing Calculator
Step 3
- In this step, we will design our calculator.
- For this, we will create object of all the components that we want to add to our window like,
- Buttons from 0 to 9.
- One clear Button and a delete button.
- Buttons for arithmetic operations.
- A text field for displaying the result.
- Two radio buttons for switching between on and off.
- One label for displaying the calculation.
- After creating object of all the components, we will set some of the properties of each component like setting their size, location and some other properties and after setting their properties we will finally add them to the frame(Window) using the add() method.
|
1 2 3 4 5 6 7 8 9 10 11 12 13 14 15 16 17 18 19 20 21 22 23 24 25 26 27 28 29 30 31 32 33 34 35 36 37 38 39 40 41 42 43 44 45 46 47 48 49 50 51 52 53 54 55 56 57 58 59 60 61 62 63 64 65 66 67 68 69 70 71 72 73 74 75 76 77 78 79 80 81 82 83 84 85 86 87 88 89 90 91 92 93 94 95 96 97 98 99 100 101 102 103 104 105 106 107 108 109 110 111 112 113 114 115 116 117 118 119 120 121 122 123 124 125 126 127 128 129 130 131 132 133 134 135 136 137 138 139 140 141 142 143 144 145 146 147 148 149 150 151 152 153 154 155 156 157 158 159 160 161 162 163 164 165 166 167 168 169 170 171 172 173 174 175 176 177 178 179 180 181 182 183 184 185 186 187 188 189 190 191 192 193 194 195 196 197 198 199 200 201 |
import javax.swing.*; import java.awt.*; public class Calculator { JFrame frame; //Creating objects of Components JLabel label = new JLabel(); JTextField textField = new JTextField(); JRadioButton onRadioButton = new JRadioButton("on"); JRadioButton offRadioButton = new JRadioButton("off"); JButton buttonZero = new JButton("0"); JButton buttonOne = new JButton("1"); JButton buttonTwo = new JButton("2"); JButton buttonThree = new JButton("3"); JButton buttonFour = new JButton("4"); JButton buttonFive = new JButton("5"); JButton buttonSix = new JButton("6"); JButton buttonSeven = new JButton("7"); JButton buttonEight = new JButton("8"); JButton buttonNine = new JButton("9"); JButton buttonDot = new JButton("."); JButton buttonClear = new JButton("C"); JButton buttonDelete = new JButton("DEL"); JButton buttonEqual = new JButton("="); JButton buttonMul = new JButton("x"); JButton buttonDiv = new JButton("/"); JButton buttonPlus = new JButton("+"); JButton buttonMinus = new JButton("-"); JButton buttonSquare = new JButton("x\u00B2"); JButton buttonReciprocal = new JButton("1/x"); JButton buttonSqrt = new JButton("\u221A"); Calculator() { prepareGUI(); addComponents(); } public void prepareGUI() { //Setting properties of JFrame(Window) frame = new JFrame(); frame.setTitle("Calculator"); frame.setSize(300, 490); frame.getContentPane().setLayout(null); frame.getContentPane().setBackground(Color.black); frame.setResizable(false); frame.setLocationRelativeTo(null); frame.setVisible(true); frame.setDefaultCloseOperation(JFrame.EXIT_ON_CLOSE); } public void addComponents() { //Setting property of Label label.setBounds(250, 0, 50, 50); label.setForeground(Color.white); frame.add(label); //Setting property of text field textField.setBounds(10, 40, 270, 40); textField.setFont(new Font("Arial", Font.BOLD, 20)); textField.setEditable(false); textField.setHorizontalAlignment(SwingConstants.RIGHT); frame.add(textField); //Setting property of on radio button onRadioButton.setBounds(10, 95, 60, 40); onRadioButton.setSelected(true); onRadioButton.setFont(new Font("Arial", Font.BOLD, 14)); onRadioButton.setBackground(Color.black); onRadioButton.setForeground(Color.white); frame.add(onRadioButton); //Setting property of off radio button offRadioButton.setBounds(10, 120, 60, 40); offRadioButton.setSelected(false); offRadioButton.setFont(new Font("Arial", Font.BOLD, 14)); offRadioButton.setBackground(Color.black); offRadioButton.setForeground(Color.white); frame.add(offRadioButton); /*Creating an object of button group and adding both the radio buttons to that button group*/ ButtonGroup buttonGroup = new ButtonGroup(); buttonGroup.add(onRadioButton); buttonGroup.add(offRadioButton); //Setting property of button 7 buttonSeven.setBounds(10, 230, 60, 40); buttonSeven.setFont(new Font("Arial", Font.BOLD, 20)); frame.add(buttonSeven); // Setting property of button 8 buttonEight.setBounds(80, 230, 60, 40); buttonEight.setFont(new Font("Arial", Font.BOLD, 20)); frame.add(buttonEight); //Setting property of button 9 buttonNine.setBounds(150, 230, 60, 40); buttonNine.setFont(new Font("Arial", Font.BOLD, 20)); frame.add(buttonNine); //Setting property of button 4 buttonFour.setBounds(10, 290, 60, 40); buttonFour.setFont(new Font("Arial", Font.BOLD, 20)); frame.add(buttonFour); //Setting property of button 5 buttonFive.setBounds(80, 290, 60, 40); buttonFive.setFont(new Font("Arial", Font.BOLD, 20)); frame.add(buttonFive); //Setting property of button 6 buttonSix.setBounds(150, 290, 60, 40); buttonSix.setFont(new Font("Arial", Font.BOLD, 20)); frame.add(buttonSix); //Setting property of button 1 buttonOne.setBounds(10, 350, 60, 40); buttonOne.setFont(new Font("Arial", Font.BOLD, 20)); frame.add(buttonOne); //Setting property of button 2 buttonTwo.setBounds(80, 350, 60, 40); buttonTwo.setFont(new Font("Arial", Font.BOLD, 20)); frame.add(buttonTwo); //Setting property of button 3 buttonThree.setBounds(150, 350, 60, 40); buttonThree.setFont(new Font("Arial", Font.BOLD, 20)); frame.add(buttonThree); //Setting property of dot button buttonDot.setBounds(150, 410, 60, 40); buttonDot.setFont(new Font("Arial", Font.BOLD, 20)); frame.add(buttonDot); //Setting property of button 0 buttonZero.setBounds(10, 410, 130, 40); buttonZero.setFont(new Font("Arial", Font.BOLD, 20)); frame.add(buttonZero); //Setting property of button = buttonEqual.setBounds(220, 350, 60, 100); buttonEqual.setFont(new Font("Arial", Font.BOLD, 20)); buttonEqual.setBackground(new Color(239, 188, 2)); frame.add(buttonEqual); //Setting property of button / buttonDiv.setBounds(220, 110, 60, 40); buttonDiv.setFont(new Font("Arial", Font.BOLD, 20)); buttonDiv.setBackground(new Color(239, 188, 2)); frame.add(buttonDiv); //Setting property of button square root buttonSqrt.setBounds(10, 170, 60, 40); buttonSqrt.setFont(new Font("Arial", Font.BOLD, 18)); frame.add(buttonSqrt); //Setting property of button X buttonMul.setBounds(220, 230, 60, 40); buttonMul.setFont(new Font("Arial", Font.BOLD, 20)); buttonMul.setBackground(new Color(239, 188, 2)); frame.add(buttonMul); //Setting property of button - buttonMinus.setBounds(220, 170, 60, 40); buttonMinus.setFont(new Font("Arial", Font.BOLD, 20)); buttonMinus.setBackground(new Color(239, 188, 2)); frame.add(buttonMinus); //Setting property of button + buttonPlus.setBounds(220, 290, 60, 40); buttonPlus.setFont(new Font("Arial", Font.BOLD, 20)); buttonPlus.setBackground(new Color(239, 188, 2)); frame.add(buttonPlus); //Setting property of button square buttonSquare.setBounds(80, 170, 60, 40); buttonSquare.setFont(new Font("Arial", Font.BOLD, 20)); frame.add(buttonSquare); //Setting property of reciprocal button buttonReciprocal.setBounds(150, 170, 60, 40); buttonReciprocal.setFont(new Font("Arial", Font.BOLD, 15)); frame.add(buttonReciprocal); //Setting property of delete button buttonDelete.setBounds(150, 110, 60, 40); buttonDelete.setFont(new Font("Arial", Font.BOLD, 12)); buttonDelete.setBackground(Color.red); buttonDelete.setForeground(Color.white); frame.add(buttonDelete); //Setting property of clear button buttonClear.setBounds(80, 110, 60, 40); buttonClear.setFont(new Font("Arial", Font.BOLD, 12)); buttonClear.setBackground(Color.red); buttonClear.setForeground(Color.white); frame.add(buttonClear); } } |
- Now run your program.

- As we can see that we have successfully added components to our window.
- Now we have to add functionalities to our button so that when we click on a particular button, some action should be performed.
- For this, we will implement ActionListener interface to our class, and if we are implementing ActionListener interface in our class then we have to override its method actionPerformed() in that class.
Adding functionalities to buttons
step 4
- For this first of all we will implement the ActionListener interface in our class and then we will override its method actionPerformed() in that class.
- Next, we will register ActionListener for all the buttons.
- Next, all the actions that we want in response when a button is clicked will be coded inside actionPerformed() method in that class.
|
1 2 3 4 5 6 7 8 9 10 11 12 13 14 15 16 17 18 19 20 21 22 23 24 25 26 27 28 29 30 31 32 33 34 35 36 37 38 39 40 41 42 43 44 45 46 47 48 49 50 51 52 53 54 55 56 57 58 59 60 61 62 63 64 65 66 67 68 69 70 71 72 73 74 75 76 77 78 79 80 81 82 83 84 85 86 87 88 89 90 91 92 93 94 95 96 97 98 99 100 101 102 103 104 105 106 107 108 109 110 111 112 113 114 115 116 117 118 119 120 121 122 123 124 125 126 127 128 129 130 131 132 133 134 135 136 137 138 139 140 141 142 143 144 145 146 147 148 149 150 151 152 153 154 155 156 157 158 159 160 161 162 163 164 165 166 167 168 169 170 171 172 173 174 175 176 177 178 179 180 181 182 183 184 185 186 187 188 189 190 191 192 193 194 195 196 197 198 199 200 201 202 203 204 205 206 207 208 209 210 211 212 213 214 215 216 217 218 219 220 221 222 223 224 225 226 227 228 229 230 231 232 233 234 235 236 237 238 239 240 241 242 243 244 245 246 247 248 249 250 251 252 253 254 255 256 257 258 259 260 261 262 263 264 265 266 267 268 269 270 271 272 273 274 275 276 277 278 279 280 281 282 283 284 285 286 287 288 289 290 291 292 293 294 295 296 297 298 299 300 301 302 303 304 305 306 307 308 309 310 311 312 313 314 315 316 317 318 319 320 321 322 323 324 325 326 327 328 329 330 331 332 333 334 335 336 337 338 339 340 341 342 343 344 345 346 347 348 349 350 351 352 353 354 355 356 357 358 359 360 361 362 363 364 365 366 367 368 369 370 371 372 373 374 375 376 377 378 379 380 381 382 383 384 385 386 387 388 389 390 391 392 393 394 395 396 397 398 399 400 401 402 403 404 405 406 407 408 409 410 411 412 413 414 415 416 417 418 419 420 |
import javax.swing.*; import java.awt.*; import java.awt.event.ActionEvent; import java.awt.event.ActionListener; //implementing ActionListener interface public class Calculator implements ActionListener { //Creating variables for our calculations double number, answer; int calculation; JFrame frame; JLabel label = new JLabel(); JTextField textField = new JTextField(); JRadioButton onRadioButton = new JRadioButton("on"); JRadioButton offRadioButton = new JRadioButton("off"); JButton buttonZero = new JButton("0"); JButton buttonOne = new JButton("1"); JButton buttonTwo = new JButton("2"); JButton buttonThree = new JButton("3"); JButton buttonFour = new JButton("4"); JButton buttonFive = new JButton("5"); JButton buttonSix = new JButton("6"); JButton buttonSeven = new JButton("7"); JButton buttonEight = new JButton("8"); JButton buttonNine = new JButton("9"); JButton buttonDot = new JButton("."); JButton buttonClear = new JButton("C"); JButton buttonDelete = new JButton("DEL"); JButton buttonEqual = new JButton("="); JButton buttonMul = new JButton("x"); JButton buttonDiv = new JButton("/"); JButton buttonPlus = new JButton("+"); JButton buttonMinus = new JButton("-"); JButton buttonSquare = new JButton("x\u00B2"); JButton buttonReciprocal = new JButton("1/x"); JButton buttonSqrt = new JButton("\u221A"); ; Calculator() { prepareGUI(); addComponents(); addActionEvent(); } public void prepareGUI() { frame = new JFrame(); frame.setTitle("Calculator"); frame.setSize(300, 490); frame.getContentPane().setLayout(null); frame.getContentPane().setBackground(Color.black); frame.setResizable(false); frame.setLocationRelativeTo(null); frame.setVisible(true); frame.setDefaultCloseOperation(JFrame.EXIT_ON_CLOSE); } public void addComponents() { label.setBounds(250, 0, 50, 50); label.setForeground(Color.white); frame.add(label); textField.setBounds(10, 40, 270, 40); textField.setFont(new Font("Arial", Font.BOLD, 20)); textField.setEditable(false); textField.setHorizontalAlignment(SwingConstants.RIGHT); frame.add(textField); onRadioButton.setBounds(10, 95, 60, 40); onRadioButton.setSelected(true); onRadioButton.setFont(new Font("Arial", Font.BOLD, 14)); onRadioButton.setBackground(Color.black); onRadioButton.setForeground(Color.white); frame.add(onRadioButton); offRadioButton.setBounds(10, 120, 60, 40); offRadioButton.setSelected(false); offRadioButton.setFont(new Font("Arial", Font.BOLD, 14)); offRadioButton.setBackground(Color.black); offRadioButton.setForeground(Color.white); frame.add(offRadioButton); ButtonGroup buttonGroup = new ButtonGroup(); buttonGroup.add(onRadioButton); buttonGroup.add(offRadioButton); buttonSeven.setBounds(10, 230, 60, 40); buttonSeven.setFont(new Font("Arial", Font.BOLD, 20)); frame.add(buttonSeven); buttonEight.setBounds(80, 230, 60, 40); buttonEight.setFont(new Font("Arial", Font.BOLD, 20)); frame.add(buttonEight); buttonNine.setBounds(150, 230, 60, 40); buttonNine.setFont(new Font("Arial", Font.BOLD, 20)); frame.add(buttonNine); buttonFour.setBounds(10, 290, 60, 40); buttonFour.setFont(new Font("Arial", Font.BOLD, 20)); frame.add(buttonFour); buttonFive.setBounds(80, 290, 60, 40); buttonFive.setFont(new Font("Arial", Font.BOLD, 20)); frame.add(buttonFive); buttonSix.setBounds(150, 290, 60, 40); buttonSix.setFont(new Font("Arial", Font.BOLD, 20)); frame.add(buttonSix); buttonOne.setBounds(10, 350, 60, 40); buttonOne.setFont(new Font("Arial", Font.BOLD, 20)); frame.add(buttonOne); buttonTwo.setBounds(80, 350, 60, 40); buttonTwo.setFont(new Font("Arial", Font.BOLD, 20)); frame.add(buttonTwo); buttonThree.setBounds(150, 350, 60, 40); buttonThree.setFont(new Font("Arial", Font.BOLD, 20)); frame.add(buttonThree); buttonDot.setBounds(150, 410, 60, 40); buttonDot.setFont(new Font("Arial", Font.BOLD, 20)); frame.add(buttonDot); buttonZero.setBounds(10, 410, 130, 40); buttonZero.setFont(new Font("Arial", Font.BOLD, 20)); frame.add(buttonZero); buttonEqual.setBounds(220, 350, 60, 100); buttonEqual.setFont(new Font("Arial", Font.BOLD, 20)); buttonEqual.setBackground(new Color(239, 188, 2)); frame.add(buttonEqual); buttonDiv.setBounds(220, 110, 60, 40); buttonDiv.setFont(new Font("Arial", Font.BOLD, 20)); buttonDiv.setBackground(new Color(239, 188, 2)); frame.add(buttonDiv); buttonSqrt.setBounds(10, 170, 60, 40); buttonSqrt.setFont(new Font("Arial", Font.BOLD, 18)); frame.add(buttonSqrt); buttonMul.setBounds(220, 230, 60, 40); buttonMul.setFont(new Font("Arial", Font.BOLD, 20)); buttonMul.setBackground(new Color(239, 188, 2)); frame.add(buttonMul); buttonMinus.setBounds(220, 170, 60, 40); buttonMinus.setFont(new Font("Arial", Font.BOLD, 20)); buttonMinus.setBackground(new Color(239, 188, 2)); frame.add(buttonMinus); buttonPlus.setBounds(220, 290, 60, 40); buttonPlus.setFont(new Font("Arial", Font.BOLD, 20)); buttonPlus.setBackground(new Color(239, 188, 2)); frame.add(buttonPlus); buttonSquare.setBounds(80, 170, 60, 40); buttonSquare.setFont(new Font("Arial", Font.BOLD, 20)); frame.add(buttonSquare); buttonReciprocal.setBounds(150, 170, 60, 40); buttonReciprocal.setFont(new Font("Arial", Font.BOLD, 15)); frame.add(buttonReciprocal); buttonDelete.setBounds(150, 110, 60, 40); buttonDelete.setFont(new Font("Arial", Font.BOLD, 12)); buttonDelete.setBackground(Color.red); buttonDelete.setForeground(Color.white); frame.add(buttonDelete); buttonClear.setBounds(80, 110, 60, 40); buttonClear.setFont(new Font("Arial", Font.BOLD, 12)); buttonClear.setBackground(Color.red); buttonClear.setForeground(Color.white); frame.add(buttonClear); } public void addActionEvent() { //Registering ActionListener to buttons onRadioButton.addActionListener(this); offRadioButton.addActionListener(this); buttonClear.addActionListener(this); buttonDelete.addActionListener(this); buttonDiv.addActionListener(this); buttonSqrt.addActionListener(this); buttonSquare.addActionListener(this); buttonReciprocal.addActionListener(this); buttonMinus.addActionListener(this); buttonSeven.addActionListener(this); buttonEight.addActionListener(this); buttonNine.addActionListener(this); buttonMul.addActionListener(this); buttonFour.addActionListener(this); buttonFive.addActionListener(this); buttonSix.addActionListener(this); buttonPlus.addActionListener(this); buttonOne.addActionListener(this); buttonTwo.addActionListener(this); buttonThree.addActionListener(this); buttonEqual.addActionListener(this); buttonZero.addActionListener(this); buttonDot.addActionListener(this); } //Overriding actionPerformed() method @Override public void actionPerformed(ActionEvent e) { Object source = e.getSource(); if (source == onRadioButton) { enable();//Calling enable() function } else if (source == offRadioButton) { disable();//Calling disable function } else if (source == buttonClear) { //Clearing texts of label and text field label.setText(""); textField.setText(""); } else if (source == buttonDelete) { //Setting functionality for delete button(backspace) int length = textField.getText().length(); int number = length - 1; if (length > 0) { StringBuilder back = new StringBuilder(textField.getText()); back.deleteCharAt(number); textField.setText(back.toString()); } if (textField.getText().endsWith("")) { label.setText(""); } } else if (source == buttonZero) { if (textField.getText().equals("0")) { return; } else { textField.setText(textField.getText() + "0"); } } else if (source == buttonOne) { textField.setText(textField.getText() + "1"); } else if (source == buttonTwo) { textField.setText(textField.getText() + "2"); } else if (source == buttonThree) { textField.setText(textField.getText() + "3"); } else if (source == buttonFour) { textField.setText(textField.getText() + "4"); } else if (source == buttonFive) { textField.setText(textField.getText() + "5"); } else if (source == buttonSix) { textField.setText(textField.getText() + "6"); } else if (source == buttonSeven) { textField.setText(textField.getText() + "7"); } else if (source == buttonEight) { textField.setText(textField.getText() + "8"); } else if (source == buttonNine) { textField.setText(textField.getText() + "9"); } else if (source == buttonDot) { if (textField.getText().contains(".")) { return; } else { textField.setText(textField.getText() + "."); } } else if (source == buttonPlus) { String str = textField.getText(); number = Double.parseDouble(textField.getText()); textField.setText(""); label.setText(str + "+"); calculation = 1; } else if (source == buttonMinus) { String str = textField.getText(); number = Double.parseDouble(textField.getText()); textField.setText(""); label.setText(str + "-"); calculation = 2; } else if (source == buttonMul) { String str = textField.getText(); number = Double.parseDouble(textField.getText()); textField.setText(""); label.setText(str + "X"); calculation = 3; } else if (source == buttonDiv) { String str = textField.getText(); number = Double.parseDouble(textField.getText()); textField.setText(""); label.setText(str + "/"); calculation = 4; } else if (source == buttonSqrt) { number = Double.parseDouble(textField.getText()); Double sqrt = Math.sqrt(number); textField.setText(Double.toString(sqrt)); } else if (source == buttonSquare) { String str = textField.getText(); number = Double.parseDouble(textField.getText()); double square = Math.pow(number, 2); String string = Double.toString(square); if (string.endsWith(".0")) { textField.setText(string.replace(".0", "")); } else { textField.setText(string); } label.setText("(sqr)" + str); } else if (source == buttonReciprocal) { number = Double.parseDouble(textField.getText()); double reciprocal = 1 / number; String string = Double.toString(reciprocal); if (string.endsWith(".0")) { textField.setText(string.replace(".0", "")); } else { textField.setText(string); } } else if (source == buttonEqual) { //Setting functionality for equal(=) button switch (calculation) { case 1: answer = number + Double.parseDouble(textField.getText()); if (Double.toString(answer).endsWith(".0")) { textField.setText(Double.toString(answer).replace(".0", "")); } else { textField.setText(Double.toString(answer)); } label.setText(""); break; case 2: answer = number - Double.parseDouble(textField.getText()); if (Double.toString(answer).endsWith(".0")) { textField.setText(Double.toString(answer).replace(".0", "")); } else { textField.setText(Double.toString(answer)); } label.setText(""); break; case 3: answer = number * Double.parseDouble(textField.getText()); if (Double.toString(answer).endsWith(".0")) { textField.setText(Double.toString(answer).replace(".0", "")); } else { textField.setText(Double.toString(answer)); } label.setText(""); break; case 4: answer = number / Double.parseDouble(textField.getText()); if (Double.toString(answer).endsWith(".0")) { textField.setText(Double.toString(answer).replace(".0", "")); } else { textField.setText(Double.toString(answer)); } label.setText(""); break; } } } public void enable() { onRadioButton.setEnabled(false); offRadioButton.setEnabled(true); textField.setEnabled(true); label.setEnabled(true); buttonClear.setEnabled(true); buttonDelete.setEnabled(true); buttonDiv.setEnabled(true); buttonSqrt.setEnabled(true); buttonSquare.setEnabled(true); buttonReciprocal.setEnabled(true); buttonMinus.setEnabled(true); buttonSeven.setEnabled(true); buttonEight.setEnabled(true); buttonNine.setEnabled(true); buttonMul.setEnabled(true); buttonFour.setEnabled(true); buttonFive.setEnabled(true); buttonSix.setEnabled(true); buttonPlus.setEnabled(true); buttonOne.setEnabled(true); buttonTwo.setEnabled(true); buttonThree.setEnabled(true); buttonEqual.setEnabled(true); buttonZero.setEnabled(true); buttonDot.setEnabled(true); } public void disable() { onRadioButton.setEnabled(true); offRadioButton.setEnabled(false); textField.setText(""); label.setText(" "); buttonClear.setEnabled(false); buttonDelete.setEnabled(false); buttonDiv.setEnabled(false); buttonSqrt.setEnabled(false); buttonSquare.setEnabled(false); buttonReciprocal.setEnabled(false); buttonMinus.setEnabled(false); buttonSeven.setEnabled(false); buttonEight.setEnabled(false); buttonNine.setEnabled(false); buttonMul.setEnabled(false); buttonFour.setEnabled(false); buttonFive.setEnabled(false); buttonSix.setEnabled(false); buttonPlus.setEnabled(false); buttonOne.setEnabled(false); buttonTwo.setEnabled(false); buttonThree.setEnabled(false); buttonEqual.setEnabled(false); buttonZero.setEnabled(false); buttonDot.setEnabled(false); } } |
|
1 2 3 4 5 6 7 8 |
import javax.swing.*; public class MainClass { public static void main(String[] args) { new Calculator(); } } |
- So finally, we have completed to code our GUI Calculator in Java using Swing components. Now Let’s run our program and do some calculations.


- You can see that as soon as we have clicked on the plus button, the text field is cleared and label showed up at the top of our calculator.
- Now we can enter the second number for our calculation.

- Now we have to click on the equals(=) button to get our result.

- Now let’s click on the off button and see what happens.

- As you can see it disabled all the buttons and cleared the label and the text field.
- You can also download this Java Calculator Source Code from the download button given below.
Simple Calculator Program in Java Source Code
- Here you can download the Java Calculator Source Code.
- The Link of the file is given below.
Calculator Program in Java using Swing PDF Download
- Her you can download the PDF of Calculator Program in Java using Swing.
- The Link of the file is given below.
So guys, this was all from this post in which we learned how to create a calculator program in Java swing Using the NetBeans IDE. If you have any doubts about this NetBeans Java Calculator Project, feel free to ask the question in the comments section.
People Are Also Reading…
- How to Play Mp3 File in Java Tutorial | Simple Steps
- Menu Driven Program in Java Using Switch Case
- Registration Form in Java With Database Connectivity
- How to Create Login Form in Java Swing
- Text to Speech in Java
- How to Create Splash Screen in Java
- Java Button Click Event
- 11 Best site to Learn Java Online for Free
- How to Connect MySQL Database in Java Using Eclipse
- How to Connect MySQL Database in Java using NetBeans
- How to Fetch Data from Database in Java to JTable
- Why Pointer are not used in Java?
- Best Laptops for Java Programming
- Number Guessing Game in Java Swing with Source Code
- Tic Tac Toe Game in Java with Source Code
your are doing a great job…….thanks so much
can i have more of your tutorials ?
I love your teaching and I want you to please help me learn more. Please send me more tutorial.
Thank you so much …I will publish more tutorials as soon as possible
Please do it for me. Because I really want to be a good Programmer. I love your style of coding and solving problems.
I will appreciate every effort you will apply for me to become a good Java Programmer.
Thank you so much for such tutorial.
Hello sir, i have tried creating this code but icons are not coming in correct positions i have to adjust them manually. Can you please help??
Hello Aastha…Thank you for commenting
The program has no Errors …..you can recheck your program !!
Verry helpful. Thank I hope God Bless you.