Hello Friends, Welcome to my new tutorial about creating a simple calculator program in Java using AWT. In this tutorial, we will see how to design and code the GUI calculator application using Java AWT.
Using this Simple Calculator Application in Java AWT, we will be able to do basic arithmetic operations like addition, subtraction, Multiplication, Division, as well as finding the Square, Square root, and reciprocal of any number.You can download the project’s source code by navigating to the end of this tutorial.
Before starting this tutorial, I assume that you have the basic concept of Java AWT Components and Java Button Click Event, which means what should be the response of a Java Button when we click on it. If you already know about these, it would be a lot easier for you to understand the tutorial.
I will use NetBeans IDE for Developing My Calculator Project, but you can use any IDE like Eclipse, IntelliJ Idea, or simply any text editor like Notepad. It doesn’t matter whatever IDE or text editor you will use for development. The coding and logic will be the same.
So without further ado, let’s start our tutorial Simple calculator program in Java using AWT.
Also Read – Simple Calculator Program in Java Using Swing
Simple Calculator Program in Java Using AWT
Creating a New Project in NetBeans
So, first of all, we need to create a new project in NetBeans. Follow these steps to create a new project.
- Open the NetBeans IDE, click on the File menu, and select New Project.
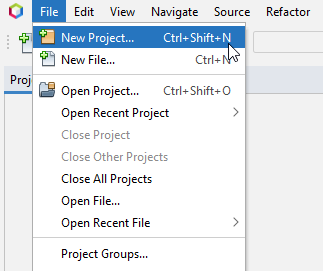
- After you click on the New Project, a new window will be opened where you have to select the Project type as “Java with Ant” and then select the Java Application.
- Then click on the Next button to proceed.

- Again, a new window will be opened where you have to give the name of your project (AwtCalculator in this Example) and tick mark in the “Create Main Class” checkbox.
- Then click on the Finish button to finish creating the Project.

Creating Display Window/Frame
In this step, we will create a display window, or we can say Frame for our calculator.
- First of all, import all the necessary packages, which are,
|
1 2 |
import java.awt.*; import java.awt.event.*; |
- We need to import the java.awt.event package too, because we will deal with button click events in our program.
- Next, Create an object of the Frame class and then set some of its properties like its size, location, layout, Background color, Visibility, and the close operation using the methods of the Frame class.
|
1 2 3 4 5 6 7 8 9 10 11 12 13 14 15 16 17 18 19 20 21 22 23 24 25 26 27 28 29 30 31 32 33 34 35 36 37 38 39 40 |
package awtcalculator; //importing all necessary packages import java.awt.*; import java.awt.event.*; public class AwtCalculator { //Creating object of Frame Class Frame frame=new Frame("Calculator"); //Creating Constructor of the Class AwtCalculator(){ prepareFrame(); } public void prepareFrame(){ //Setting Frame's Property frame.setSize(300,490); frame.setLayout(null); frame.setBackground(new Color(12,12,93)); frame.setResizable(false); frame.setLocationRelativeTo(null); frame.setVisible(true); frame.addWindowListener( new WindowAdapter(){ public void windowClosing(WindowEvent e) { System.exit(0); } } ); } public static void main(String[] args) { //Creating object of the AwtCalculator class which will call the constructor AwtCalculator calculator = new AwtCalculator(); } } |
- Now Run your program.

- As you can see, we have successfully created our display window, and the next thing we have to do is add components to it.
Adding Components to Frame/Window
In this step, we will create the object of all the components that we want to add to our Frame/Window, which are,
-
- Buttons from 0 to 9.
- One clear Button and a delete button.
- Buttons for arithmetic operations.
- One button for negative Calculations.
- A text field for displaying the result.
- Two checkboxes for switching between on and off.
- One label for displaying the calculation.
- After creating the object of all the components, we will set some of the properties of each component, like setting their size, location, and some other properties.
- After setting their properties, we will finally add them to the frame(Window) using the add() method.
|
1 2 3 4 5 6 7 8 9 10 11 12 13 14 15 16 17 18 19 20 21 22 23 24 25 26 27 28 29 30 31 32 33 34 35 36 37 38 39 40 41 42 43 44 45 46 47 48 49 50 51 52 53 54 55 56 57 58 59 60 61 62 63 64 65 66 67 68 69 70 71 72 73 74 75 76 77 78 79 80 81 82 83 84 85 86 87 88 89 90 91 92 93 94 95 96 97 98 99 100 101 102 103 104 105 106 107 108 109 110 111 112 113 114 115 116 117 118 119 120 121 122 123 124 125 126 127 128 129 130 131 132 133 134 135 136 137 138 139 140 141 142 143 144 145 146 147 148 149 150 151 152 153 154 155 156 157 158 159 160 161 162 163 164 165 166 167 168 169 170 171 172 173 174 175 176 177 178 179 180 181 182 183 184 185 186 187 188 189 190 191 192 193 194 195 196 197 198 199 200 201 202 203 204 205 206 207 208 209 210 211 212 213 214 215 216 217 218 219 220 221 222 |
package awtcalculator; //importing all necessary packages import java.awt.*; import java.awt.event.*; public class AwtCalculator { //Creating object of Frame Class Frame frame=new Frame("Calculator"); //Creating objects of all the components Label label=new Label(); TextField textField=new TextField(); CheckboxGroup checkboxGroup=new CheckboxGroup(); Checkbox onCheckbox=new Checkbox("On",checkboxGroup,true); Checkbox offCheckbox=new Checkbox("Off",checkboxGroup,false); Button buttonZero = new Button("0"); Button buttonOne = new Button("1"); Button buttonTwo = new Button("2"); Button buttonThree = new Button("3"); Button buttonFour = new Button("4"); Button buttonFive = new Button("5"); Button buttonSix = new Button("6"); Button buttonSeven = new Button("7"); Button buttonEight = new Button("8"); Button buttonNine = new Button("9"); Button buttonDot = new Button("."); Button buttonClear = new Button("CLR"); Button buttonDelete = new Button("DEL"); Button buttonEqual = new Button("="); Button buttonNegative = new Button("(-)"); Button buttonMul = new Button("x"); Button buttonDiv = new Button("/"); Button buttonPlus = new Button("+"); Button buttonMinus = new Button("-"); Button buttonSquare = new Button("x\u00B2"); Button buttonReciprocal = new Button("1/x"); Button buttonSqrt = new Button("\u221A"); //Creating Constructor of the Class AwtCalculator(){ prepareFrame(); addComponents(); } public void prepareFrame(){ //Setting Frame's Property frame.setSize(300,490); frame.setLayout(null); frame.setBackground(new Color(12,12,93)); frame.setResizable(false); frame.setLocationRelativeTo(null); frame.setVisible(true); frame.addWindowListener( new WindowAdapter(){ public void windowClosing(WindowEvent e) { System.exit(0); } } ); } public void addComponents(){ //Setting properties of the Components and adding them to the Frame label.setBounds(10, 40, 200, 20); label.setForeground(Color.white); label.setFont(new Font("Arial",Font.BOLD,15)); frame.add(label); textField.setBounds(15,60,270,35); textField.setFont(new Font("Arial",Font.BOLD,20)); textField.setEditable(false); frame.add(textField); onCheckbox.setBounds(15, 100, 60, 40); onCheckbox.setFont(new Font("Arial", Font.BOLD, 14)); onCheckbox.setBackground(new Color(12,12,93)); onCheckbox.setForeground(Color.white); onCheckbox.setFocusable(false); frame.add(onCheckbox); offCheckbox.setBounds(15, 125, 60, 40); offCheckbox.setFont(new Font("Arial", Font.BOLD, 14)); offCheckbox.setBackground(new Color(12,12,93)); offCheckbox.setForeground(Color.white); offCheckbox.setFocusable(false); frame.add(offCheckbox); buttonSeven.setBounds(15, 230, 60, 40); buttonSeven.setFont(new Font("Arial", Font.BOLD, 20)); buttonSeven.setFocusable(false); frame.add(buttonSeven); buttonEight.setBounds(85, 230, 60, 40); buttonEight.setFont(new Font("Arial", Font.BOLD, 20)); buttonEight.setFocusable(false); frame.add(buttonEight); buttonNine.setBounds(155, 230, 60, 40); buttonNine.setFont(new Font("Arial", Font.BOLD, 20)); buttonNine.setFocusable(false); frame.add(buttonNine); buttonFour.setBounds(15, 290, 60, 40); buttonFour.setFont(new Font("Arial", Font.BOLD, 20)); buttonFour.setFocusable(false); frame.add(buttonFour); buttonFive.setBounds(85, 290, 60, 40); buttonFive.setFont(new Font("Arial", Font.BOLD, 20)); buttonFive.setFocusable(false); frame.add(buttonFive); buttonSix.setBounds(155, 290, 60, 40); buttonSix.setFont(new Font("Arial", Font.BOLD, 20)); buttonSix.setFocusable(false); frame.add(buttonSix); buttonOne.setBounds(15, 350, 60, 40); buttonOne.setFont(new Font("Arial", Font.BOLD, 20)); buttonOne.setFocusable(false); frame.add(buttonOne); buttonTwo.setBounds(85, 350, 60, 40); buttonTwo.setFont(new Font("Arial", Font.BOLD, 20)); buttonTwo.setFocusable(false); frame.add(buttonTwo); buttonThree.setBounds(155, 350, 60, 40); buttonThree.setFont(new Font("Arial", Font.BOLD, 20)); buttonThree.setFocusable(false); frame.add(buttonThree); buttonDot.setBounds(155, 410, 60, 40); buttonDot.setFont(new Font("Arial", Font.BOLD, 20)); buttonDot.setFocusable(false); frame.add(buttonDot); buttonZero.setBounds(15, 410, 60, 40); buttonZero.setFont(new Font("Arial", Font.BOLD, 20)); buttonZero.setFocusable(false); frame.add(buttonZero); buttonNegative.setBounds(85,410,60,40); buttonNegative.setFont(new Font("Arial",Font.BOLD,20)); buttonNegative.setFocusable(false); frame.add(buttonNegative); buttonEqual.setBounds(225, 350, 60, 100); buttonEqual.setFont(new Font("Arial", Font.BOLD, 20)); buttonEqual.setBackground(new Color(72, 231, 172)); buttonEqual.setFocusable(false); frame.add(buttonEqual); buttonDiv.setBounds(225, 110, 60, 40); buttonDiv.setFont(new Font("Arial", Font.BOLD, 20)); buttonDiv.setBackground(new Color(72, 231, 172)); buttonDiv.setFocusable(false); frame.add(buttonDiv); buttonSqrt.setBounds(15, 170, 60, 40); buttonSqrt.setFont(new Font("Arial", Font.BOLD, 18)); buttonSqrt.setFocusable(false); frame.add(buttonSqrt); buttonMul.setBounds(225, 230, 60, 40); buttonMul.setFont(new Font("Arial", Font.BOLD, 20)); buttonMul.setBackground(new Color(72, 231, 172)); buttonMul.setFocusable(false); frame.add(buttonMul); buttonMinus.setBounds(225, 170, 60, 40); buttonMinus.setFont(new Font("Arial", Font.BOLD, 20)); buttonMinus.setBackground(new Color(72, 231, 172)); buttonMinus.setFocusable(false); frame.add(buttonMinus); buttonPlus.setBounds(225, 290, 60, 40); buttonPlus.setFont(new Font("Arial", Font.BOLD, 20)); buttonPlus.setBackground(new Color(72, 231, 172)); buttonPlus.setFocusable(false); frame.add(buttonPlus); buttonSquare.setBounds(85, 170, 60, 40); buttonSquare.setFont(new Font("Arial", Font.BOLD, 20)); buttonSquare.setFocusable(false); frame.add(buttonSquare); buttonReciprocal.setBounds(155, 170, 60, 40); buttonReciprocal.setFont(new Font("Arial", Font.BOLD, 15)); buttonReciprocal.setFocusable(false); frame.add(buttonReciprocal); buttonDelete.setBounds(155, 110, 60, 40); buttonDelete.setFont(new Font("Arial", Font.BOLD, 12)); buttonDelete.setBackground(Color.red); buttonDelete.setForeground(Color.white); buttonDelete.setFocusable(false); frame.add(buttonDelete); buttonClear.setBounds(85, 110, 60, 40); buttonClear.setFont(new Font("Arial", Font.BOLD, 12)); buttonClear.setBackground(Color.red); buttonClear.setForeground(Color.white); buttonClear.setFocusable(false); frame.add(buttonClear); } public static void main(String[] args) { //Creating object of the AwtCalculator class which will call the constructor AwtCalculator calculator = new AwtCalculator(); } } |
- Now run your program.
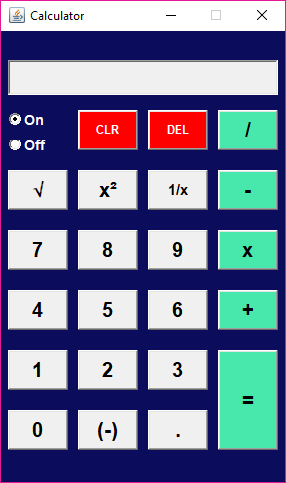
- As you can see that we have successfully added the components to our Frame/Window.
- Now we have to add functionalities to our button so that some action should be performed when we click on a particular button.
- For this, we will implement the ActionListener interface in our class. If we implement the ActionListener interface in our class, we have to override its method actionPerformed() in that class.
- We have also created the checkboxes for switching between on and off. For this, we need to implement the ItemListener interface in our class. If we implement the ItemListener interface in our class, we have to override its method itemStateChanged() in that class.
Adding Functionalities
- First of all, we will implement the ActionListener and ItemListener interface in our class, and then we will override their methods actionPerformed() and itemStateChanged() in that class.
- Next, we will register ActionListener for all the buttons and ItemListener for checkboxes.
- Next, all the actions that we want in response when a button is clicked will be coded inside the actionPerformed() method, and when a checkbox is clicked, its code will be coded inside the itemStateChanged() method.
|
1 2 3 4 5 6 7 8 9 10 11 12 13 14 15 16 17 18 19 20 21 22 23 24 25 26 27 28 29 30 31 32 33 34 35 36 37 38 39 40 41 42 43 44 45 46 47 48 49 50 51 52 53 54 55 56 57 58 59 60 61 62 63 64 65 66 67 68 69 70 71 72 73 74 75 76 77 78 79 80 81 82 83 84 85 86 87 88 89 90 91 92 93 94 95 96 97 98 99 100 101 102 103 104 105 106 107 108 109 110 111 112 113 114 115 116 117 118 119 120 121 122 123 124 125 126 127 128 129 130 131 132 133 134 135 136 137 138 139 140 141 142 143 144 145 146 147 148 149 150 151 152 153 154 155 156 157 158 159 160 161 162 163 164 165 166 167 168 169 170 171 172 173 174 175 176 177 178 179 180 181 182 183 184 185 186 187 188 189 190 191 192 193 194 195 196 197 198 199 200 201 202 203 204 205 206 207 208 209 210 211 212 213 214 215 216 217 218 219 220 221 222 223 224 225 226 227 228 229 230 231 232 233 234 235 236 237 238 239 240 241 242 243 244 245 246 247 248 249 250 251 252 253 254 255 256 257 258 259 260 261 262 263 264 265 266 267 268 269 270 271 272 273 274 275 276 277 278 279 280 281 282 283 284 285 286 287 288 289 290 291 292 293 294 295 296 297 298 299 300 301 302 303 304 305 306 307 308 309 310 311 312 313 314 315 316 317 318 319 320 321 322 323 324 325 326 327 328 329 330 331 332 333 334 335 336 337 338 339 340 341 342 343 344 345 346 347 348 349 350 351 352 353 354 355 356 357 358 359 360 361 362 363 364 365 366 367 368 369 370 371 372 373 374 375 376 377 378 379 380 381 382 383 384 385 386 387 388 389 390 391 392 393 394 395 396 397 398 399 400 401 402 403 404 405 406 407 408 409 410 411 412 413 414 415 416 417 418 419 420 421 422 423 424 425 426 427 428 429 430 431 432 433 434 435 436 437 438 439 440 441 442 443 444 445 446 447 448 449 450 451 452 453 454 455 456 457 458 459 460 461 462 463 464 465 466 467 |
package awtcalculator; //importing all necessary packages import java.awt.*; import java.awt.event.*; public class AwtCalculator implements ActionListener, ItemListener { //Declaring and Initializing variable for calculations double num1=0, num2=0, result=0; int calculation; //Creating object of Frame Class Frame frame=new Frame("Calculator"); //Creating objects of all the components Label label=new Label(); TextField textField=new TextField(); CheckboxGroup checkboxGroup=new CheckboxGroup(); Checkbox onCheckbox=new Checkbox("On",checkboxGroup,true); Checkbox offCheckbox=new Checkbox("Off",checkboxGroup,false); Button buttonZero = new Button("0"); Button buttonOne = new Button("1"); Button buttonTwo = new Button("2"); Button buttonThree = new Button("3"); Button buttonFour = new Button("4"); Button buttonFive = new Button("5"); Button buttonSix = new Button("6"); Button buttonSeven = new Button("7"); Button buttonEight = new Button("8"); Button buttonNine = new Button("9"); Button buttonDot = new Button("."); Button buttonClear = new Button("CLR"); Button buttonDelete = new Button("DEL"); Button buttonEqual = new Button("="); Button buttonNegative = new Button("(-)"); Button buttonMul = new Button("x"); Button buttonDiv = new Button("/"); Button buttonPlus = new Button("+"); Button buttonMinus = new Button("-"); Button buttonSquare = new Button("x\u00B2"); Button buttonReciprocal = new Button("1/x"); Button buttonSqrt = new Button("\u221A"); //Creating Constructor of the Class AwtCalculator(){ prepareFrame(); addComponents(); addActionEvent(); } public void prepareFrame(){ //Setting Frame's Property frame.setSize(300,490); frame.setLayout(null); frame.setBackground(new Color(12,12,93)); frame.setResizable(false); frame.setLocationRelativeTo(null); frame.setVisible(true); frame.addWindowListener( new WindowAdapter(){ public void windowClosing(WindowEvent e) { System.exit(0); } } ); } public void addComponents(){ //Setting properties of the Components and adding them to the Frame label.setBounds(10, 40, 200, 20); label.setForeground(Color.white); label.setFont(new Font("Arial",Font.BOLD,15)); frame.add(label); textField.setBounds(15,60,270,35); textField.setFont(new Font("Arial",Font.BOLD,20)); textField.setEditable(false); frame.add(textField); onCheckbox.setBounds(15, 100, 60, 40); onCheckbox.setFont(new Font("Arial", Font.BOLD, 14)); onCheckbox.setBackground(new Color(12,12,93)); onCheckbox.setForeground(Color.white); onCheckbox.setFocusable(false); frame.add(onCheckbox); offCheckbox.setBounds(15, 125, 60, 40); offCheckbox.setFont(new Font("Arial", Font.BOLD, 14)); offCheckbox.setBackground(new Color(12,12,93)); offCheckbox.setForeground(Color.white); offCheckbox.setFocusable(false); frame.add(offCheckbox); buttonSeven.setBounds(15, 230, 60, 40); buttonSeven.setFont(new Font("Arial", Font.BOLD, 20)); buttonSeven.setFocusable(false); frame.add(buttonSeven); buttonEight.setBounds(85, 230, 60, 40); buttonEight.setFont(new Font("Arial", Font.BOLD, 20)); buttonEight.setFocusable(false); frame.add(buttonEight); buttonNine.setBounds(155, 230, 60, 40); buttonNine.setFont(new Font("Arial", Font.BOLD, 20)); buttonNine.setFocusable(false); frame.add(buttonNine); buttonFour.setBounds(15, 290, 60, 40); buttonFour.setFont(new Font("Arial", Font.BOLD, 20)); buttonFour.setFocusable(false); frame.add(buttonFour); buttonFive.setBounds(85, 290, 60, 40); buttonFive.setFont(new Font("Arial", Font.BOLD, 20)); buttonFive.setFocusable(false); frame.add(buttonFive); buttonSix.setBounds(155, 290, 60, 40); buttonSix.setFont(new Font("Arial", Font.BOLD, 20)); buttonSix.setFocusable(false); frame.add(buttonSix); buttonOne.setBounds(15, 350, 60, 40); buttonOne.setFont(new Font("Arial", Font.BOLD, 20)); buttonOne.setFocusable(false); frame.add(buttonOne); buttonTwo.setBounds(85, 350, 60, 40); buttonTwo.setFont(new Font("Arial", Font.BOLD, 20)); buttonTwo.setFocusable(false); frame.add(buttonTwo); buttonThree.setBounds(155, 350, 60, 40); buttonThree.setFont(new Font("Arial", Font.BOLD, 20)); buttonThree.setFocusable(false); frame.add(buttonThree); buttonDot.setBounds(155, 410, 60, 40); buttonDot.setFont(new Font("Arial", Font.BOLD, 20)); buttonDot.setFocusable(false); frame.add(buttonDot); buttonZero.setBounds(15, 410, 60, 40); buttonZero.setFont(new Font("Arial", Font.BOLD, 20)); buttonZero.setFocusable(false); frame.add(buttonZero); buttonNegative.setBounds(85,410,60,40); buttonNegative.setFont(new Font("Arial",Font.BOLD,20)); buttonNegative.setFocusable(false); frame.add(buttonNegative); buttonEqual.setBounds(225, 350, 60, 100); buttonEqual.setFont(new Font("Arial", Font.BOLD, 20)); buttonEqual.setBackground(new Color(72, 231, 172)); buttonEqual.setFocusable(false); frame.add(buttonEqual); buttonDiv.setBounds(225, 110, 60, 40); buttonDiv.setFont(new Font("Arial", Font.BOLD, 20)); buttonDiv.setBackground(new Color(72, 231, 172)); buttonDiv.setFocusable(false); frame.add(buttonDiv); buttonSqrt.setBounds(15, 170, 60, 40); buttonSqrt.setFont(new Font("Arial", Font.BOLD, 18)); buttonSqrt.setFocusable(false); frame.add(buttonSqrt); buttonMul.setBounds(225, 230, 60, 40); buttonMul.setFont(new Font("Arial", Font.BOLD, 20)); buttonMul.setBackground(new Color(72, 231, 172)); buttonMul.setFocusable(false); frame.add(buttonMul); buttonMinus.setBounds(225, 170, 60, 40); buttonMinus.setFont(new Font("Arial", Font.BOLD, 20)); buttonMinus.setBackground(new Color(72, 231, 172)); buttonMinus.setFocusable(false); frame.add(buttonMinus); buttonPlus.setBounds(225, 290, 60, 40); buttonPlus.setFont(new Font("Arial", Font.BOLD, 20)); buttonPlus.setBackground(new Color(72, 231, 172)); buttonPlus.setFocusable(false); frame.add(buttonPlus); buttonSquare.setBounds(85, 170, 60, 40); buttonSquare.setFont(new Font("Arial", Font.BOLD, 20)); buttonSquare.setFocusable(false); frame.add(buttonSquare); buttonReciprocal.setBounds(155, 170, 60, 40); buttonReciprocal.setFont(new Font("Arial", Font.BOLD, 15)); buttonReciprocal.setFocusable(false); frame.add(buttonReciprocal); buttonDelete.setBounds(155, 110, 60, 40); buttonDelete.setFont(new Font("Arial", Font.BOLD, 12)); buttonDelete.setBackground(Color.red); buttonDelete.setForeground(Color.white); buttonDelete.setFocusable(false); frame.add(buttonDelete); buttonClear.setBounds(85, 110, 60, 40); buttonClear.setFont(new Font("Arial", Font.BOLD, 12)); buttonClear.setBackground(Color.red); buttonClear.setForeground(Color.white); buttonClear.setFocusable(false); frame.add(buttonClear); } public void addActionEvent(){ //Registering ActionListener and ItemListener onCheckbox.addItemListener(this); offCheckbox.addItemListener(this); buttonClear.addActionListener(this); buttonDelete.addActionListener(this); buttonDiv.addActionListener(this); buttonSqrt.addActionListener(this); buttonSquare.addActionListener(this); buttonReciprocal.addActionListener(this); buttonMinus.addActionListener(this); buttonSeven.addActionListener(this); buttonEight.addActionListener(this); buttonNine.addActionListener(this); buttonMul.addActionListener(this); buttonFour.addActionListener(this); buttonFive.addActionListener(this); buttonSix.addActionListener(this); buttonPlus.addActionListener(this); buttonOne.addActionListener(this); buttonTwo.addActionListener(this); buttonThree.addActionListener(this); buttonEqual.addActionListener(this); buttonZero.addActionListener(this); buttonDot.addActionListener(this); buttonNegative.addActionListener(this); } public static void main(String[] args) { //Creating object of the AwtCalculator class which will call the constructor AwtCalculator calculator = new AwtCalculator(); } //Overriding actionPerformed() method @Override public void actionPerformed(ActionEvent e) { Object source = e.getSource(); if (source == buttonClear) { textField.setText(""); }else if(source==buttonDelete){ int length = textField.getText().length(); int number = length - 1; if (length > 0) { StringBuilder back = new StringBuilder(textField.getText()); back.deleteCharAt(number); textField.setText(back.toString()); }if (textField.getText().endsWith("")) { label.setText(""); } } else if(source==buttonZero){ if(textField.getText().equals("0")) { return; } else { textField.setText(textField.getText() + "0"); } } else if (source == buttonOne) { textField.setText(textField.getText() + "1"); } else if (source == buttonTwo) { textField.setText(textField.getText() + "2"); } else if (source == buttonThree) { textField.setText(textField.getText() + "3"); } else if (source == buttonFour) { textField.setText(textField.getText() + "4"); } else if (source == buttonFive) { textField.setText(textField.getText() + "5"); } else if (source == buttonSix) { textField.setText(textField.getText() + "6"); } else if (source == buttonSeven) { textField.setText(textField.getText() + "7"); } else if (source == buttonEight) { textField.setText(textField.getText() + "8"); } else if (source == buttonNine) { textField.setText(textField.getText() + "9"); } else if (source == buttonDot) { if (textField.getText().contains(".")) { return; } else { textField.setText(textField.getText() + "."); } }else if(source==buttonPlus){ String str = textField.getText(); num1=Double.parseDouble(textField.getText()); calculation=1; textField.setText(""); label.setText(str + "+"); }else if(source==buttonMinus){ String str = textField.getText(); num1=Double.parseDouble(textField.getText()); calculation=2; textField.setText(""); label.setText(str + "-"); }else if(source==buttonMul){ String str = textField.getText(); num1=Double.parseDouble(textField.getText()); calculation=3; textField.setText(""); label.setText(str + "X"); }else if(source==buttonDiv){ String str = textField.getText(); num1=Double.parseDouble(textField.getText()); calculation=4; textField.setText(""); label.setText(str + "/"); }else if (source == buttonSqrt) { String str = textField.getText(); num1 = Double.parseDouble(textField.getText()); Double sqrt = Math.sqrt(num1); textField.setText(Double.toString(sqrt)); } else if (source == buttonSquare) { String str = textField.getText(); num1 = Double.parseDouble(textField.getText()); double square = Math.pow(num1, 2); String string = Double.toString(square); if (string.endsWith(".0")) { textField.setText(string.replace(".0", "")); } else { textField.setText(string); } } else if (source == buttonReciprocal) { num1 = Double.parseDouble(textField.getText()); double reciprocal = 1 / num1; String string = Double.toString(reciprocal); if (string.endsWith(".0")) { textField.setText(string.replace(".0", "")); } else { textField.setText(string); } }else if(source==buttonNegative){ if(textField.getText().equals("")) { return; } double temp = Double.parseDouble(textField.getText()); temp = temp * (-1); textField.setText(String.valueOf(temp)); } else if(source==buttonEqual){ //Setting functionalities for equals button num2=Double.parseDouble(textField.getText()); switch(calculation){ case 1: result=num1+num2; break; case 2: result=num1-num2; break; case 3: result=num1*num2; break; case 4: result=num1/num2; break; } if (Double.toString(result).endsWith(".0")) { textField.setText(Double.toString(result).replace(".0", "")); } else { textField.setText(Double.toString(result)); } label.setText(""); num1=result; } } //Overriding itemStateChanged() method @Override public void itemStateChanged(ItemEvent e) { //Setting functionalities for on and off button if(e.getSource()==onCheckbox){ enable(); } else if(e.getSource()==offCheckbox){ disable(); } } public void enable(){ onCheckbox.setEnabled(false); offCheckbox.setEnabled(true); textField.setEnabled(true); label.setEnabled(true); buttonClear.setEnabled(true); buttonDelete.setEnabled(true); buttonDiv.setEnabled(true); buttonSqrt.setEnabled(true); buttonSquare.setEnabled(true); buttonReciprocal.setEnabled(true); buttonMinus.setEnabled(true); buttonSeven.setEnabled(true); buttonEight.setEnabled(true); buttonNine.setEnabled(true); buttonMul.setEnabled(true); buttonFour.setEnabled(true); buttonFive.setEnabled(true); buttonSix.setEnabled(true); buttonPlus.setEnabled(true); buttonOne.setEnabled(true); buttonTwo.setEnabled(true); buttonThree.setEnabled(true); buttonEqual.setEnabled(true); buttonZero.setEnabled(true); buttonDot.setEnabled(true); buttonNegative.setEnabled(true); } public void disable(){ onCheckbox.setEnabled(true); offCheckbox.setEnabled(false); label.setText(""); textField.setText(""); buttonClear.setEnabled(false); buttonDelete.setEnabled(false); buttonDiv.setEnabled(false); buttonSqrt.setEnabled(false); buttonSquare.setEnabled(false); buttonReciprocal.setEnabled(false); buttonMinus.setEnabled(false); buttonSeven.setEnabled(false); buttonEight.setEnabled(false); buttonNine.setEnabled(false); buttonMul.setEnabled(false); buttonFour.setEnabled(false); buttonFive.setEnabled(false); buttonSix.setEnabled(false); buttonPlus.setEnabled(false); buttonOne.setEnabled(false); buttonTwo.setEnabled(false); buttonThree.setEnabled(false); buttonEqual.setEnabled(false); buttonZero.setEnabled(false); buttonDot.setEnabled(false); buttonNegative.setEnabled(false); } } |
- Now let’s run our program and do some calculations.
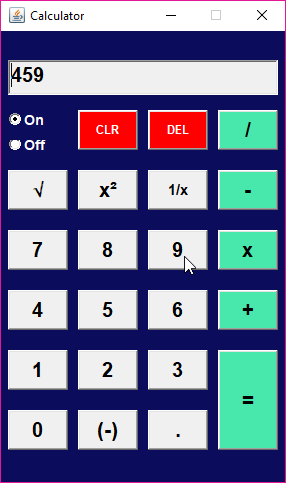

- As you can see that as soon as we clicked on the multiplication(X) button, the text field got cleared, and the Label showed up at the top of the calculator.
- Now we need to enter the second number for calculation.
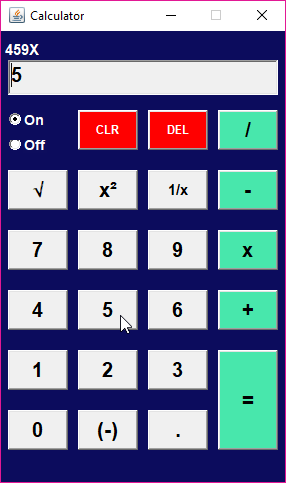
- Next, Click on the Equals(=) button to get the Result.
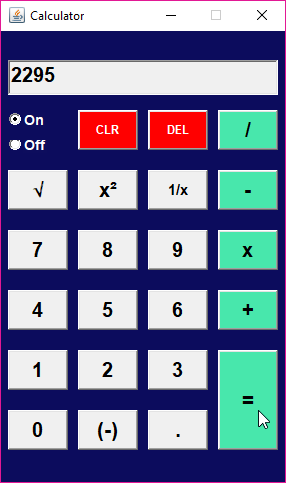
- Let’s see what happens when we click on the off button.
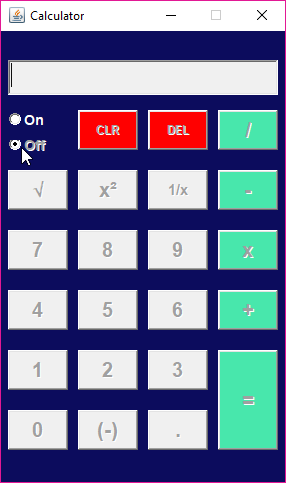
- As you can see, as soon as we clicked on the “off” button, all the buttons got disabled as well as the text field and label cleared, Except the “on” button so that we can again change it to on state.
Simple Calculator Program in Java Using AWT Source Code
- You can download the source code of this Calculator project in Java using AWT by clicking on the below link.
So guys, this was all from this tutorial, Simple Calculator Program in Java Using AWT. If you have any questions regarding this post, then you can ask the questions in the comment section.
People are also Reading…..
- Menu Driven Program in Java Using Switch Case
- How to Create Calculator in Java Swing
- How to Create Tic Tac Toe Game in Java
- How to Create Login Form in Java Swing
- Registration Form In Java with Database Connectivity
- How to Create Splash Screen In Java
- How to Create Mp3 Player in Java
- How to Connect MySQL Database in Java Using NetBeans
- 11 Best Site to Learn Java Online for Free