Hello Friends, Welcome to another tutorial. In this tutorial, we will learn to connect MySQL to NetBeans in Java step by step. Most of the time, it usually happens that we face a lot of problems while connecting our program to the database, but if you follow this tutorial properly, then you will be able to connect the Java program with the MySQL database using NetBeans quite easily.
In my previous tutorial, we have already seen How to connect MySQL Database in Java Using Eclipse. Now, without further ado, Let’s start our tutorial on Connect MySQL to NetBeans in Java step by step.
If you want to download the PDF of the article, then you can download it from here. How to Connect MySQL Database in Java using NetBeans PDF.
Contents
- 1 Connect MySQL to NetBeans in Java
- 1.1 Downloading and Installing NetBeans
- 1.2 Creating a Database and Table in MySQL
- 1.3 Creating a Java Application in NetBeans
- 1.4 Adding MySQL connector jar file in NetBeans
- 1.5 Connecting Java Program with MySQL Database
- 1.6 Inserting Data into The MySQL Database using Java
- 1.7 Updating Data in The MySQL Database using Java
- 1.8 Fetch Data from MySQL Database to Java
- 1.9 Deleting Data from the MySQL Database using Java
- 2 How to Connect MySQL Database in Java using NetBeans PDF
Connect MySQL to NetBeans in Java
Downloading and Installing NetBeans
- The first thing you need to do is download and install the NetBeans IDE in your system. If you have already installed the NetBeans IDE in your system, then you can skip this part and move forward.
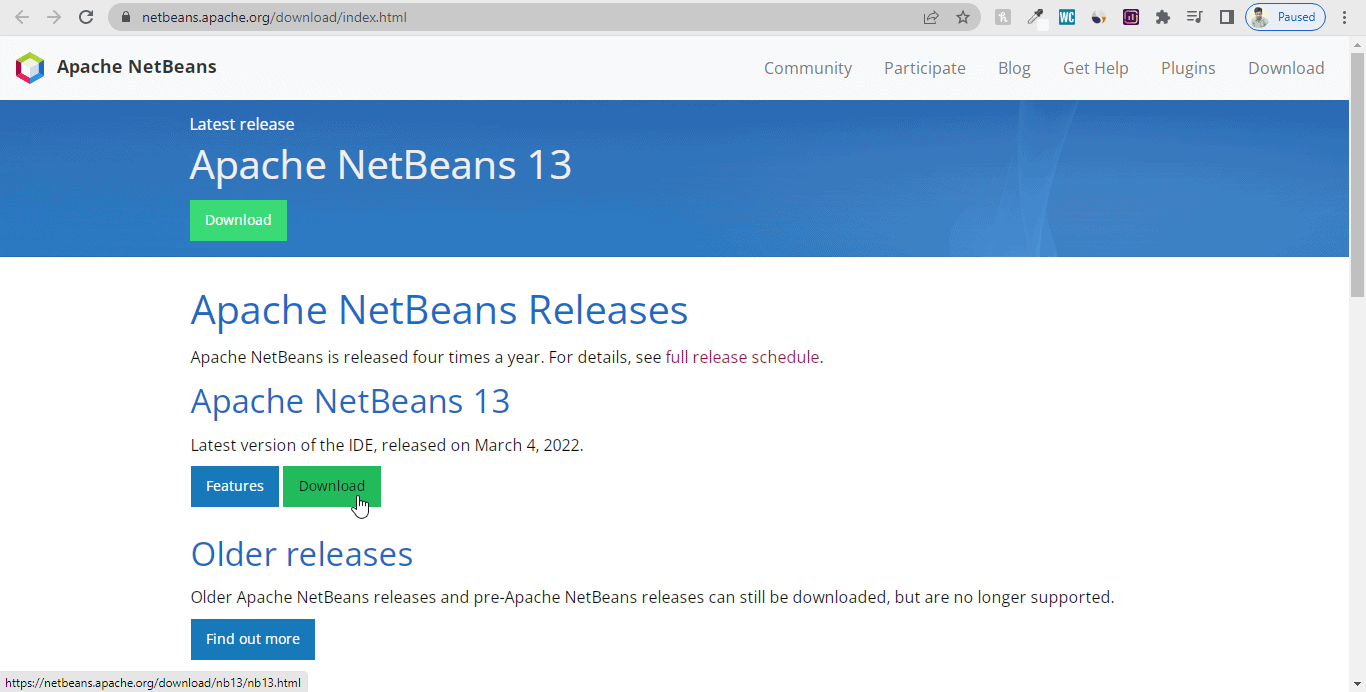
- Go to the official website of Apache NetBeans to download the latest version of NetBeans IDE by clicking on this link. https://netbeans.apache.org/download/index.html
- After going to the official website of Apache NetBeans, you will see a download button to download the latest version of NetBeans IDE for your system.
- You can see the figure below to understand.
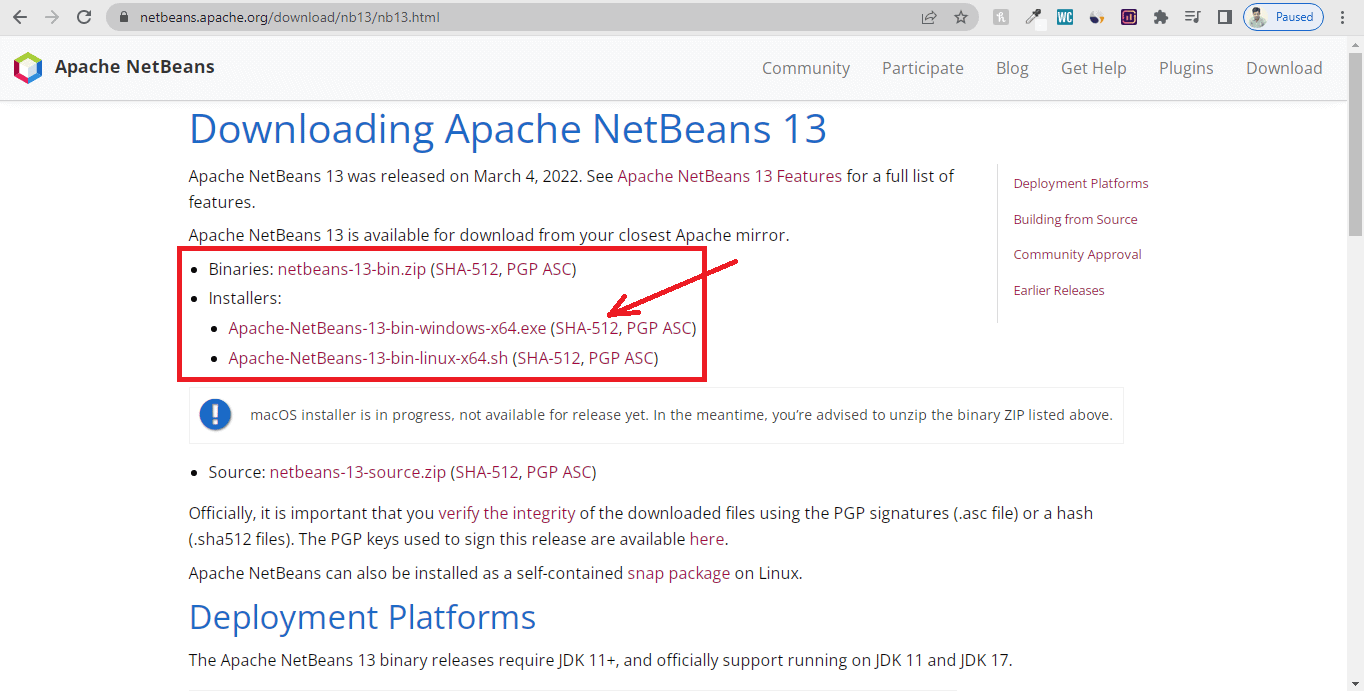
- After clicking on the Download button, you will be redirected to the another web page, and there you will have an option to download the IDE according to your Operating System, as you can see in the figure below.
- I am Downloading the IDE for Windows Operating System 64-bit.
- After you click on the link, you will be again redirected to another web page and now click on the link as shown in the figure below to start downloading the NetBeans installer file.
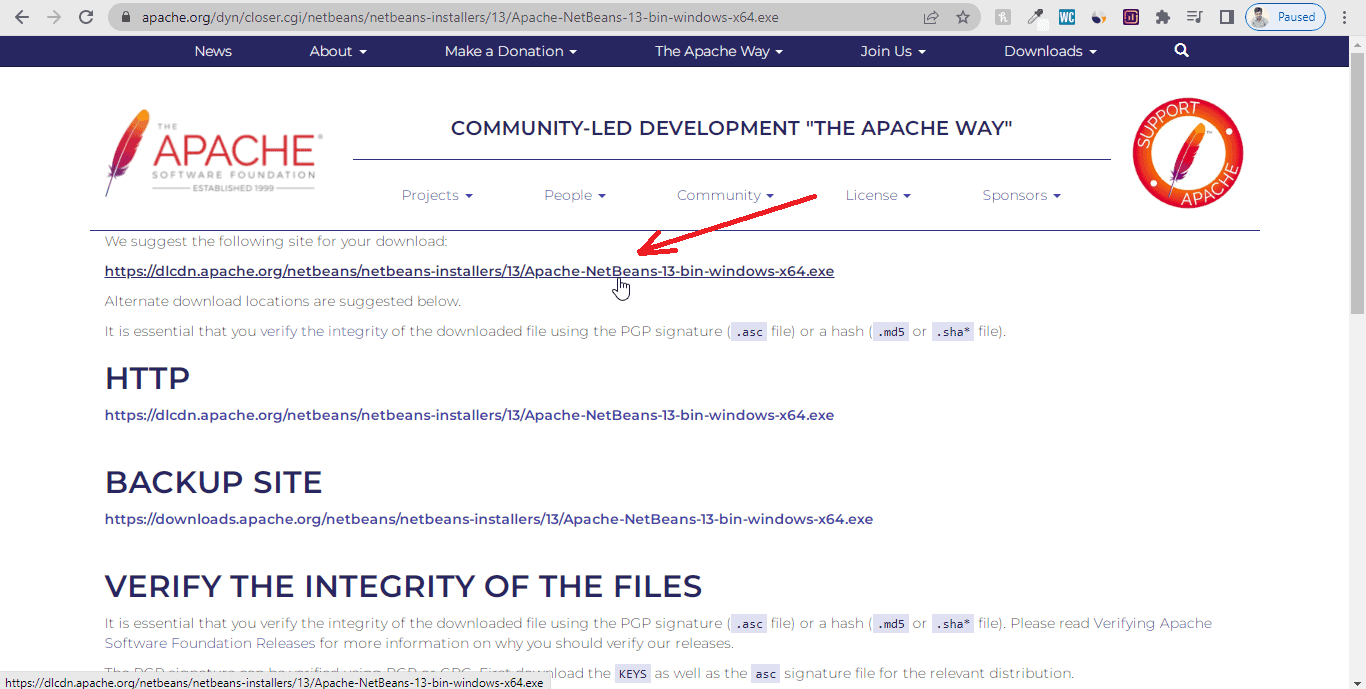
- After clicking, the NetBeans installer file will start to download. Please sit back and relax till it finishes.
- After downloading the file, locate the file’s location in your system and install it the same way you install any application.
Creating a Database and Table in MySQL
Since you have finished downloading and installing the NetBeans IDE to your system, Now we will create a database and table in MySQL.
- To create a database and table, you can either choose MySQL command-line client or MySQL Workbench. MySQL workbench is nothing but a GUI version of the MySQL console where we can visually design, model, and generate databases.
- If you don’t know how to download and install MySQL command-line client and MySQL Workbench to your system, then you can follow the links given below for the proper installation process step by step.
How to Install MySQL
How to Install MySQL Workbench
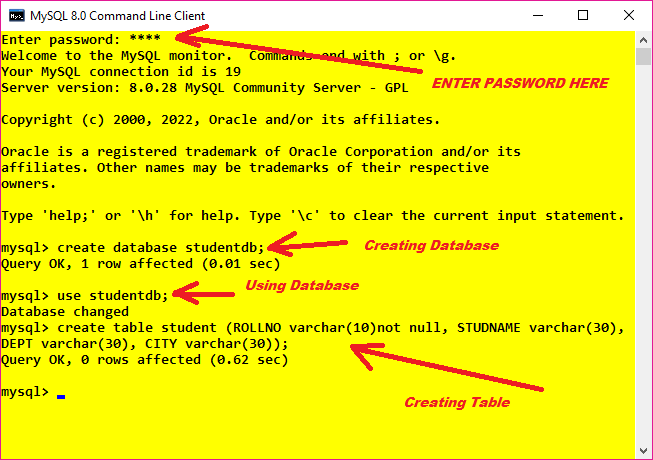
- I will use MySQL command-line client in this tutorial, open MySQL command-line client, and enter your password so that you can connect to the MySQL database.
- This is the same password you provided while installing the MySQL database in your system.
- Now create a database named “studentdb” and a table named “student” inside it with columns.
- ROLLNO
- STUDNAME
- DEPT
- CITY
|
1 2 3 |
create database studentdb; use studentdb; create table student (ROLLNO varchar(10)not null, STUDNAME varchar(30), DEPT varchar(30), CITY varchar(30)); |
Creating a Java Application in NetBeans
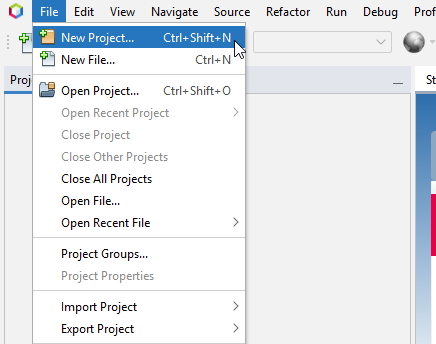
- Open NetBeans and click on the New Project under the File Menu section, as shown in the figure below. ( File>>New Project )
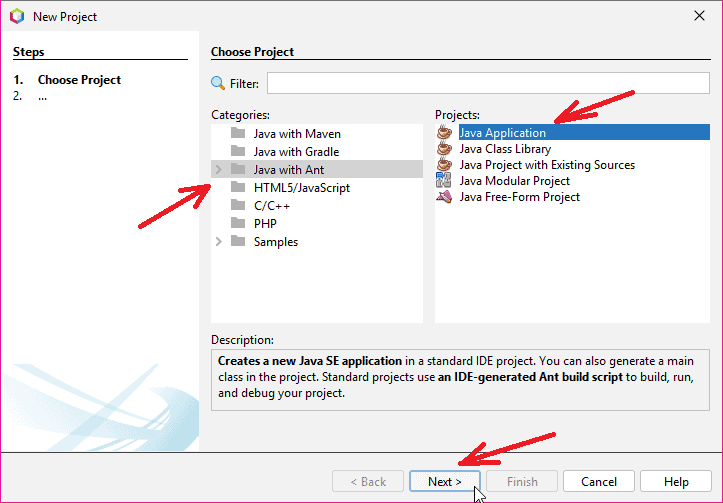
- After that, the New Project dialog box will be opened, where you have to choose the type of project you want to build with NetBeans.
- Select Java with Ant in the Categories section and then select Java Application in the Projects section.
- Then click on the Next button to proceed.
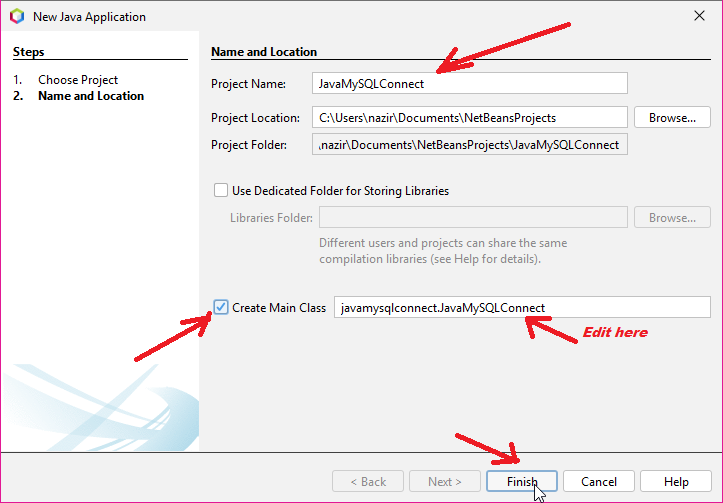
- In the next window, it will ask you to enter the project name. Give a name to your project (JavaMySQLConnect in this example).
- Tick mark the Create main class option, and it will create the main class. You can also edit the name of the main class if you want to.
- Lastly, click on the Finish button to complete, as shown in the figure below.
Adding MySQL connector jar file in NetBeans
- In order to connect your Java program with the MySQL database, you need to include MySQL JDBC driver, which is a JAR file, namely mysql-connector-java-8.0.27.jar. The version number of the Jar file may be different.
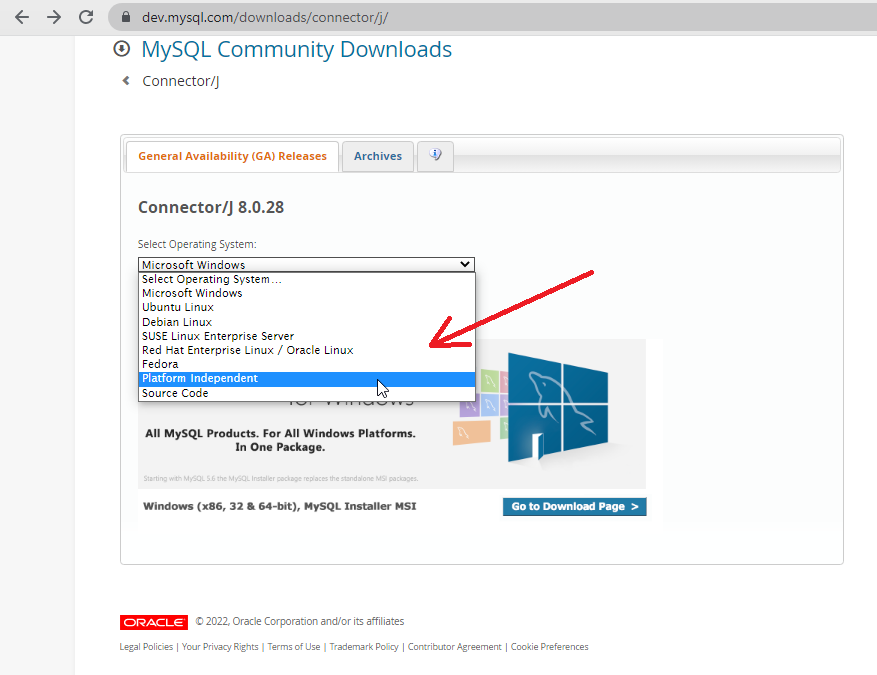
- To download the latest version of MySQL connector, you can visit this link (MySQL Connector Java download).
- After visiting the link, select platform independent from the drop-down menu, as illustrated in the figure below.
- Then download the Platform Independent (Architecture Independent), ZIP Archive as shown in the figure below.
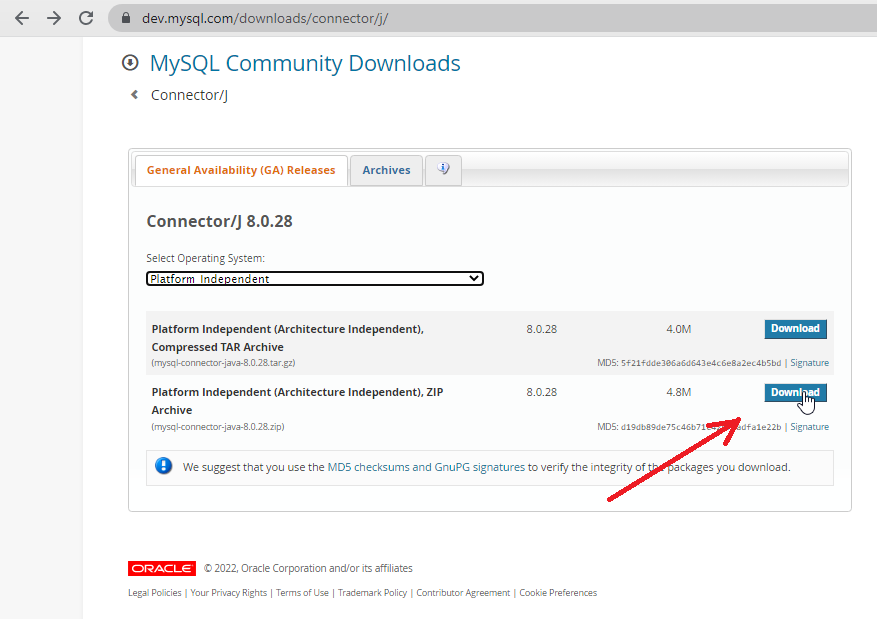
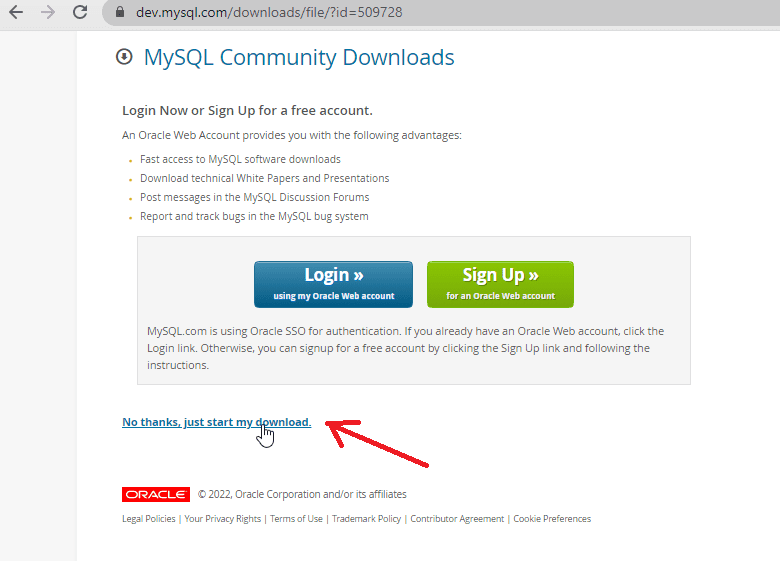
- After you click on the download button, you will be redirected to another web page where you will be asked to login or sign up for the Oracle web account. Since we are only concerned about downloading the file, you can click on the link No thanks, just start my download to start downloading the file as shown in the figure below.
- After downloading the zip archive, you need to extract it, and you will get the jar file.
- Next, you have to include this Jar file into your project so that you will be able to connect your Java program with the MySQL database.
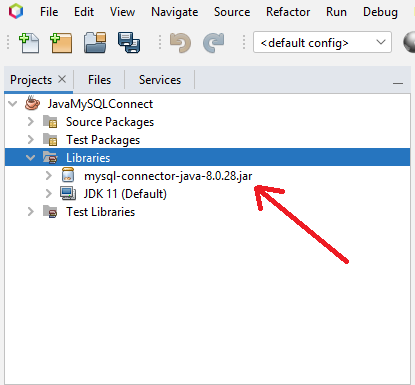
- Go to the Project panel window and expand your project, and there you will see the Libraries folder under your project directory.
- Right-click on the Libraries folder, and you will see an option of “Add Jar/Folder..” click on that.
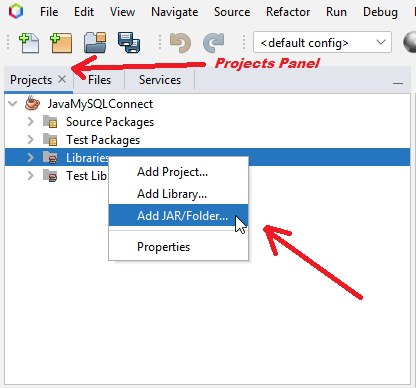
- After you click on that option, a new window will be opened, and now you have to locate the location of the MySQL connector jar file and after selecting the Jar file, click on the Open button as shown in the figure below.
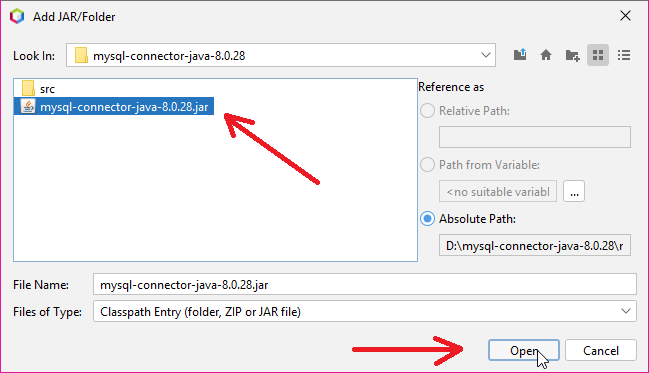
- Now you will be able to see that the MySQL connector jar file has been successfully added under the Libraries folder, as shown in the figure below.
Connecting Java Program with MySQL Database
Since you have already finished adding the jar file to your project, now you are ready to connect your Java program with the MySQL Database. Let’s quickly look at the Java code to connect to MySQL database in NetBeans.
- import java.sql package so that you will be able to perform JDBC operations like creating and executing sql queries as it includes all the classes and interfaces to perform JDBC operations.
- Establish a connection using DriverManager.getConnection(String URL) and it returns a Connection reference.
- In String URL parameter you have to write like this jdbc:mysql://localhost:3306/studentdb”, “root”, “root” where,
- jdbc is the API.
- mysql is the database.
- localhost is the name of the server in which MySQL is running.
- 3306 is the port number.
- studentdb is the database name. If your database name is different, then you have to replace this name with your database name.
- The first root is the username of the MySQL database. It is the default username for the MySQL database. If you have provided a different username in your MySQL database, then you have to provide that username.
- The second root is the password that you give while installing the MySQL database. If your password is different, then provide that password at that place.
- SQL Exception might occur while connecting to the database, So you need to surround it with the try-catch block.
- Programming Example is given below.
|
1 2 3 4 5 6 7 8 9 10 11 12 13 14 15 16 17 18 19 |
package javamysqlconnect; import java.sql.*; //Importing java.sql package public class JavaMySQLConnect { public static void main(String[] args) { try { Connection connection = DriverManager.getConnection("jdbc:mysql://localhost:3306/studentdb", "root", "root");//Establishing connection System.out.println("Connected With the database successfully"); //Message after successful connection } catch (SQLException e) { System.out.println("Error while connecting to the database"); //Message if something goes wrong while conneting to the database } } } |
- Output of the program is given below

Inserting Data into The MySQL Database using Java
As we have successfully connected the MySQL database with Java using NetBeans, Now it’s time to insert some data into our table. If you are familiar with the Prepared Statement in Java and about SQL INSERT query, then it will be a lot easier for you to add data to your table. Let’s quickly look at the steps to insert data into the table.
- Create a PreparedStatement object and use SQL INSERT query to add data to the table.
- Specify the values for each parameter through the PreparedStatement object.
- Execute the query by calling the executeUpdate() method of the PreparedStatement object.
- Programming example is given below.
|
1 2 3 4 5 6 7 8 9 10 11 12 13 14 15 16 17 18 19 20 21 22 23 24 25 26 27 28 29 30 31 32 33 |
package javamysqlconnect; import java.sql.*; public class JavaMySQLConnect { public static void main(String[] args) { try { Connection connection = DriverManager.getConnection("jdbc:mysql://localhost:3306/studentdb", "root", "root");//Establishing connection System.out.println("Connected With the database successfully"); //Creating PreparedStatement Object PreparedStatement preparedStatement =connection.prepareStatement("insert into student values(?,?,?,?)"); //Setting values for each parameter preparedStatement.setString(1,"1"); preparedStatement.setString(2,"Mehtab"); preparedStatement.setString(3,"Computer"); preparedStatement.setString(4,"Ranchi"); //Executing Query preparedStatement.executeUpdate(); System.out.println("Data inserted Successfully"); } catch (SQLException e) { System.out.println("Error while connecting to the database"); } } } |
- Now run your program.

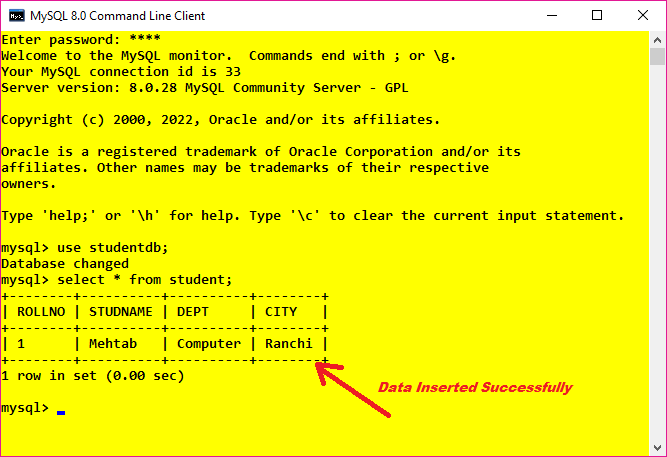
- To check whether the data has been inserted in the table or not, Open the MySQL database, connect it by entering the password and write the following query.
|
1 2 |
use studentdb; select * from student; |
Updating Data in The MySQL Database using Java
- To update data in the MySQL database, you have to use SQL UPDATE query as shown in the programming example below.
|
1 2 3 4 5 6 7 8 9 10 11 12 13 14 15 16 17 18 19 20 21 22 23 24 25 26 27 28 29 30 31 32 |
package javamysqlconnect; import java.sql.*; public class JavaMySQLConnect { public static void main(String[] args) { try { Connection connection = DriverManager.getConnection("jdbc:mysql://localhost:3306/studentdb", "root", "root");//Establishing connection System.out.println("Connected With the database successfully"); //Using SQL UPDATE query to update data in the table PreparedStatement preparedStatement =connection.prepareStatement("update Student set CITY=? where ROLLNO=?"); //Updating Value preparedStatement.setString(1,"Delhi"); preparedStatement.setString(2,"1"); //Executing Query preparedStatement.executeUpdate(); System.out.println("Data Updated Successfully"); } catch (SQLException e) { System.out.println("Error while connecting to the database"); } } } |
- Now run your program.

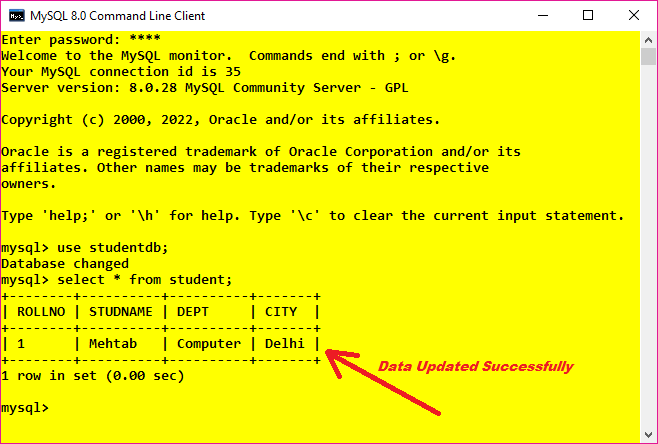
- To check whether the data has been updated in the table or not, Open the MySQL database, connect it by entering the password and write the following query.
|
1 2 |
use studentdb; select * from student; |
Fetch Data from MySQL Database to Java
- To fetch data from the table, we will use the SQL SELECT query.
- In order to get the results, we will use the Java ResultSet object.
- Programming Example is given below.
|
1 2 3 4 5 6 7 8 9 10 11 12 13 14 15 16 17 18 19 20 21 22 23 24 25 26 27 28 29 30 31 32 33 34 35 36 37 38 39 40 |
package javamysqlconnect; import java.sql.*; public class JavaMySQLConnect { public static void main(String[] args) { try { Connection connection = DriverManager.getConnection("jdbc:mysql://localhost:3306/studentdb", "root", "root");//Establishing connection System.out.println("Connected With the database successfully"); //Using SQL SELECT Query PreparedStatement preparedStatement =connection.prepareStatement("select * from student"); //Creating Java ResultSet object ResultSet resultSet = preparedStatement.executeQuery(); //Getting Results while(resultSet.next()){ String rollNo=resultSet.getString("ROLLNO"); String name=resultSet.getString("STUDNAME"); String dept=resultSet.getString("DEPT"); String city=resultSet.getString("CITY"); //Printing Results System.out.println("Roll no = "+rollNo); System.out.println("Name = "+name); System.out.println("Department = "+dept); System.out.println("City = "+city); } } catch (SQLException e) { System.out.println("Error while connecting to the database"); } } } |
- Now run your program.

Deleting Data from the MySQL Database using Java
- To delete data from the table, we will use the SQL DELETE query.
- Programming Example is given below.
|
1 2 3 4 5 6 7 8 9 10 11 12 13 14 15 16 17 18 19 20 21 22 23 24 25 26 27 28 29 30 31 |
package javamysqlconnect; import java.sql.*; public class JavaMySQLConnect { public static void main(String[] args) { try { Connection connection = DriverManager.getConnection("jdbc:mysql://localhost:3306/studentdb", "root", "root");//Establishing connection System.out.println("Connected With the database successfully"); //Using SQL DELETE query to delete data PreparedStatement preparedStatement =connection.prepareStatement("delete from student where STUDNAME=?"); //Setting value preparedStatement.setString(1,"Mehtab"); //Executing Query preparedStatement.execute(); System.out.println("Data deleted successfully"); } catch (SQLException e) { System.out.println("Error while connecting to the database"); } } } |
- Now run your program.

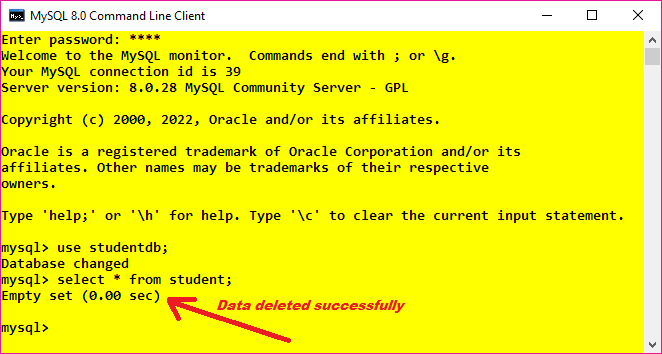
- To check whether the data has been deleted or not, Open the MySQL database, connect it by entering the password and write the following query.
|
1 2 |
use studentdb; select * from student; |
How to Connect MySQL Database in Java using NetBeans PDF
- You can download the PDF version of the article from the below link.
Conculusion
Finally, We have concluded that connecting the MySQL database to Java using NetBeans IDE is not as difficult as we think. All we need is to follow the steps correctly.
Now I am wrapping up this tutorial, connect MySQL to NetBeans in Java and feel free to comment down below if you have any queries regarding this post. To get these types of awesome posts, stay tuned with Tutorials Field. HAPPY CODING!!!
People Are Also Reading…
How to Connect MySQL Database in Java using Notepad
How to Connect MySQL Database in Java using Eclipse
How to install MySQL Workbench
Login form in Java Swing with source code
Registration form in Java with database connectivity
How to install MySQL database
Simple Calculator Program in Java
Java Button click event tutorial
thank you brother for the awesome pdf and explanation it saves lot of time 👍👍